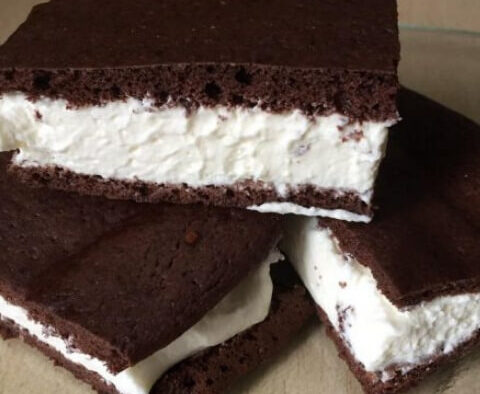
I might even go as far as saying that it is one of my most successful keto replicas of iconic foods. So incredibly like the real McCoy and yet so healthy, it’s hard to get one’s head around it. Add to that an impossibly short prep and bake time. And the result is a look-alike and taste-alike faux Kinder Milk Slice like you won’t find anywhere else. I dare you to prove me wrong 
I used to be addicted to Kinder Milk Slice. Scrap that. I used to love anything ‘Kinder’, actually. Ferrero just can’t get it wrong with its confections, as far as I’m concerned. Everything they produce is simply delicious. And highly addictive. Fetta al Latte (Milk Slice) was always my favourite.
Ingredients
For the sponge layers:
- 2 eggs
- 70g erythritol
- ¾ tsp pure stevia powder
- 20g cold-pressed, high-oleic sunflower oil
- pinch of fine Himalayan pink salt
- 5g tapioca flour
- 15g unsweetened dark cocoa powder
- 10g fine coconut flour
- ½ tsp baking powder
For the filling:
- 50g whipping cream
- 5g gelatine powder
- 100g mascarpone
- ½ tsp vanilla extract
- 25g icing ‘sugar’
Instructions
To make the sponge layers:
- pre-heat oven to 190°C static.
- sift and mix dry ingredients (bar sweeteners) and set aside.
- using an electric hand-held whisk, beat eggs until foamy and doubled in volume; add sweeteners and whip again until pale, creamy and fluffy.
- using a spatula or spoon, incorporate oil, then dry ingredients – the mixture will deflate and return to liquid.
- line a 17cm x 27cm tray with non-stick parchment paper, using a little smear of butter around the sides to ‘glue’ the paper to the tray and prevent it from curling inwards during baking.
- pour cocoa mixture into the lined tray, ensuring it is evenly spread edge to edge.
- bake for 9 minutes, then remove tray from oven immediately and let it cool for 5 minutes.
- lay out a tea-towel and place a fresh sheet of parchment paper over one side, then flip sponge over it.
- peel away old paper sheet – keeping it almost parallel to the sponge will make it come away cleanly.
- cover the sponge first with cling film and then with the loose half of the tea towel – this technique is to trap moisture so the sponge doesn’t dry up.
- leave to cool completely while you prepare the filling.
To make the filling:
- add whipping cream to a small microwave-safe bowl and sprinkle gelatine powder over it; stir and leave to bloom for a couple of minutes, then blast at 600W for 30 seconds; stir until gelatine has completely dissolved and there are no visible lumps; set aside to cool down.
- in a separate bowl, mix mascarpone, icing ‘sugar’ and vanilla extract until soft and creamy, then add the cream/gelatine mixture and stir energetically with a fork.
- when the mixture looks like a homogenous ricotta-like mess, it is ready to use.
To assemble and complete:
- uncover cocoa sponge and discard cling film.
- turn the sponge so the long side runs left to right; cut vertically across the centre.
- separate the two halves and spread the creamy filling over one half, using a flexible spatula to achieve a levelled layer, all the way to the edges.
- flip the other half of sponge over and press to seal the filling.
- smooth the edges with a small spatula or knife tip, wrap carefully and chill for at least 4 hours (best overnight).
- once set, remove wrapping and slice once horizontally and twice vertically, to obtain 6 slices in total.
- keep chilled and in a lidded container, or on a serving plate/board covered with cling film.
Nutrition
- Yield: 6 slices
- Serving: 1 slice
- Calories: 178
- Fat: 17g
- Net Carbs: 1.8g
- Protein: 4g