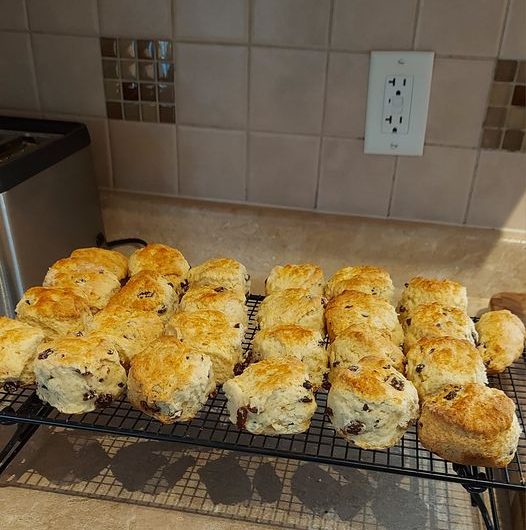
Warm Gluten-Free Fruit Scones offer everything people enjoy about a traditional British scone: a lightly golden top, tender centre, buttery flavor, and generous pieces of dried fruit. This straightforward recipe transforms a few familiar baking ingredients into comforting homemade scones that can be prepared in approximately 25 minutes and served for breakfast, brunch, afternoon tea, or a simple snack.
These easy gluten-free scones are made with gluten-free all-purpose flour, baking powder, sugar, salt, cold butter, dried fruit, egg, and milk. Cold butter helps create a delicate texture, while the egg and milk provide enough moisture to hold the dough together. The dried fruit adds natural sweetness and a pleasantly chewy contrast to the soft crumb.
Making scones without wheat flour can sometimes be challenging because gluten normally helps baked goods hold their shape. A suitable gluten-free flour blend containing xanthan gum solves much of that problem. When the dough is handled gently and baked in a properly preheated oven, the finished fruit scones can rise well and remain tender rather than becoming dry or excessively crumbly.
Why You Will Love These Gluten-Free Fruit Scones
These homemade gluten-free fruit scones are quick enough for an ordinary morning but attractive enough for a traditional afternoon tea table. The preparation takes about ten minutes, while baking requires only 12 to 15 minutes. There is no yeast, rising period, electric mixer, or complicated shaping technique, making this recipe accessible to less-experienced bakers.
The flavor is gently sweet rather than dessert-like. A quarter cup of sugar balances the butter and flour without hiding the flavor of the dried fruit. Raisins provide a familiar traditional taste, dried cranberries add a slightly sharper fruitiness, and a suitable mixed dried-fruit combination gives every scone a little variety while preserving the original recipe.
Another appealing quality is the texture. When correctly prepared, the scones have lightly crisp edges and a soft, buttery interior. They are satisfying on their own and even more comforting when served warm. Their mild sweetness also allows them to pair naturally with butter, jam, or cream without making the complete serving taste excessively sugary.
What Makes These Scones Gluten-Free?
Traditional British fruit scones rely on wheat flour, which contains the gluten proteins that provide elasticity and structure. This recipe replaces wheat flour with gluten-free all-purpose flour. A good commercial blend usually combines several naturally gluten-free flours and starches so that it performs more like conventional all-purpose flour during mixing, shaping, and baking.
The selected gluten-free flour blend should contain xanthan gum, as specified in the ingredient list. Xanthan gum provides some of the binding and structural support that gluten would normally offer. It helps prevent the scones from spreading excessively, becoming sandy, or falling into crumbs as soon as they are cut open and served.
Anyone preparing these scones for a person with celiac disease or a serious gluten intolerance should check every product label. Baking powder, dried fruit, butter, and other packaged ingredients may be processed in facilities that also handle wheat. Clean bowls, baking trays, cutters, utensils, and work surfaces are also important when avoiding gluten cross-contact for medical reasons.
Choosing the Right Gluten-Free Flour Blend
A dependable gluten-free all-purpose flour blend is the foundation of this easy fruit scone recipe. Choose a blend intended as a general replacement for ordinary all-purpose flour rather than a single flour such as almond, coconut, rice, or buckwheat flour. Individual flours absorb moisture differently and cannot automatically replace a balanced commercial blend in the same quantity.
The recipe calls for two cups of gluten-free all-purpose flour containing xanthan gum. Check the ingredient label before beginning because not every blend includes it. Since the original recipe has been designed around a blend with xanthan gum, selecting the correct product helps the dough bind properly without requiring changes to the stated ingredient list.
When measuring the flour with cups, loosen it first and spoon it lightly into the measuring cup. Level the surface without pressing or packing the flour. Scooping directly from a tightly filled bag can add too much flour, producing stiff dough and dry scones. Accurate measuring is particularly important in gluten-free baking because different blends absorb liquid in different ways.
Why Cold Butter Is Essential
Cold butter is one of the main secrets behind tender, bakery-style gluten-free scones. When small pieces of butter remain cold inside the dough, they melt during baking and release steam. That steam contributes to a lighter texture and creates delicate spaces throughout the interior rather than producing a heavy, uniformly dense crumb.
Cut the half cup of butter into small cubes before adding it to the dry mixture. Use your fingertips to rub the butter into the flour until the mixture resembles coarse breadcrumbs. Work efficiently because warm hands and a warm kitchen can soften the butter quickly. Visible small butter pieces are acceptable and can help produce a more tender result.
Avoid melting or softening the butter before use. Liquid butter coats the flour differently and can create greasy, heavy scones with less rise. If the cubed butter becomes noticeably soft while the other ingredients are being prepared, place it in the refrigerator briefly so it is properly chilled before being rubbed into the flour mixture.
The Role of Baking Powder
Baking powder gives these gluten-free scones their lift. The recipe uses one tablespoon, which may appear generous compared with some cake recipes, but scone dough is thicker and needs sufficient leavening to expand in the short baking period. Fresh, active baking powder helps the scones rise instead of remaining low and compact.
Check the expiration date before baking, especially if the container has been open for a long time. Old baking powder can lose strength and lead to flat scones even when the remaining method is followed correctly. Measure it carefully and whisk it thoroughly into the gluten-free flour so the leavening is evenly distributed throughout the batch.
Once the milk and egg are added, the baking powder begins reacting with moisture. Shape and cut the dough without unnecessary delay so it can enter the hot oven while the leavening action is effective. A fully preheated oven supplies immediate heat, helping the scones rise and develop a lightly golden exterior within 12 to 15 minutes.
Selecting Dried Fruit for the Scones
The recipe calls for half a cup of dried fruit, with raisins, dried cranberries, or a suitable mixture offered as the original choices. Raisins create the most familiar British-style fruit scone, while dried cranberries provide a brighter, slightly tart flavor. Mixed dried fruit can offer variation in sweetness, color, and texture across the batch.
If the dried fruit pieces are particularly large, cut them into smaller portions so they distribute evenly. Pieces of a similar size are easier to incorporate and make the dough simpler to cut. Avoid increasing the total quantity because too much fruit can weaken the structure, interfere with rising, and cause the scones to break apart.
Check the fruit for hard stems or compact clumps before adding it. Separate any pieces that are stuck together and stir them through the buttery flour mixture until evenly dispersed. Good distribution ensures that each scone receives some fruit and prevents one area of the dough from becoming much heavier than the rest.
How Sugar and Salt Improve the Flavor
A quarter cup of sugar gives the scones a mild sweetness that complements the fruit without making them taste like frosted cake. This balanced sweetness is ideal for breakfast and afternoon tea because the baked scones can still be served with jam, butter, or cream. Measure the sugar accurately to preserve both flavor and texture.
The pinch of salt may seem small, but it plays an important role. Salt balances sweetness and makes the flavors of the butter and dried fruit more noticeable. Without it, the scones can taste flat even when every other ingredient has been measured correctly. Whisk it into the flour so it does not remain concentrated in one place.
Keeping the original sugar amount also supports the surface color and tenderness of the scones. Although some dried fruits taste sweeter than others, changing the sugar can affect more than flavor. Following the provided quantities gives the most dependable balance between a lightly sweet crumb and the concentrated sweetness of raisins, cranberries, or mixed fruit.
How Egg and Milk Form the Dough
One large egg and half a cup of milk provide moisture and help bind the gluten-free flour. The egg contributes richness, color, and stability, while the milk hydrates the dry ingredients. Whisking them together before adding them to the bowl makes it easier to distribute both ingredients without repeatedly stirring or overworking the dough.
Pour the egg-and-milk mixture into the flour gradually enough to control the consistency. Gluten-free flour blends can vary slightly in absorbency, but the complete original quantities should be retained. Stir gently until a soft dough forms and no large areas of completely dry flour remain. The dough should be cohesive but not heavily worked.
A small amount of additional milk from the listed ingredient is used to brush the tops before baking. This light coating encourages an attractive golden finish. Apply it only to the top surfaces when possible because milk running down the cut sides may reduce the clean rise and cause the outer edges to become unnecessarily dark.
Preparing the Oven and Baking Tray
Preheat the oven to 200°C or 400°F before mixing the dough. Scones need strong, immediate heat to activate the baking powder, melt the cold butter, and produce a good rise. Placing them in an oven that is still warming can cause the butter to melt slowly and leak before the structure has begun to set.
Line a flat baking sheet with parchment paper. The paper prevents sticking and makes cleanup easier without adding grease that could spread around the bases. Use a tray large enough to arrange the scones with a little space between them so hot air can move around each piece and promote even baking.
Place the oven rack near the middle unless the oven manufacturer recommends a different position for baking. The middle area generally provides balanced heat around the tops and bottoms. If your oven has known hot spots, rotate the tray once near the end of baking, but avoid opening the door repeatedly during the early rising stage.
Mixing the Dry Ingredients Correctly
Place the gluten-free all-purpose flour, baking powder, sugar, and salt in a large mixing bowl. Whisk them together until the baking powder and salt are evenly distributed. This simple step prevents pockets of leavening and helps every scone rise consistently. Break up any visible flour lumps before adding the butter.
Add the cold cubed butter and rub it into the flour with your fingertips. Lift and lightly press the pieces rather than squeezing the mixture into a paste. Stop when it resembles coarse breadcrumbs with a few small butter pieces remaining. The mixture should feel cool and loose rather than oily or compacted.
Stir the dried fruit through the flour-and-butter mixture before adding the wet ingredients. Coating the fruit lightly in flour helps distribute it and reduces clumping. Use a spoon or spatula and make sure the fruit reaches the bottom of the bowl instead of remaining in a layer across the surface.
Bringing the Scone Dough Together
Whisk the egg and milk together in a separate bowl or measuring jug. Add this wet mixture to the prepared dry ingredients and stir gently. A flexible spatula or blunt table knife works well because it brings the ingredients together without compressing them as heavily as prolonged kneading would.
As soon as a soft dough forms, stop mixing. The dough may look a little rougher than ordinary wheat-based dough, which is normal. It does not need to become perfectly smooth inside the bowl. Overmixing can warm the butter, crush the fruit, and make the finished scones heavier instead of light and tender.
If some dry crumbs remain at the bottom, use gentle folding and pressing movements to incorporate them. Avoid aggressively beating the mixture. Gluten-free scone dough benefits from careful handling because its structure is more delicate. The goal is a cohesive mixture that can be transferred and shaped without becoming wet, sticky, or overly compact.
Shaping the Dough Without Overworking It
Lightly dust the work surface with some of the measured gluten-free flour and transfer the dough onto it. Bring the mixture together gently with your hands. Do not knead it like yeast bread because scones require a tender texture, and excessive handling can warm the butter and press out the air needed for a lighter result.
Pat the dough into a round approximately one inch thick. Keep the thickness as even as possible so all the scones bake at a similar speed. A very thin round will produce low, dry scones, while an excessively thick shape may brown outside before the centres are completely baked.
Use your hands rather than a rolling pin when possible. Patting gives you better control and reduces compression. If the dough sticks, apply only a light dusting of gluten-free flour to your hands or the surface. Adding too much loose flour while shaping can dry the exterior and disturb the original ingredient balance.
Cutting Tall and Even Scones
Use a clean round cutter to make individual scones. Press the cutter straight down through the dough and lift it straight up. Twisting can seal or compress the edges, which may limit the rise and create uneven sides. A sharp-edged cutter generally produces a neater shape than the rim of a thick drinking glass.
Place the cut pieces on the prepared baking sheet with a small space between them. Gather the remaining dough scraps gently and pat them together again. Cut additional scones without repeatedly kneading the scraps. The final pieces may look slightly more rustic because the dough has received additional handling, but they should still taste good.
Try to cut the scones in similar sizes and thicknesses. Uneven pieces will not finish baking simultaneously, causing smaller ones to dry while larger ones remain underbaked. Consistent shaping is one of the easiest ways to achieve a batch with evenly golden tops, properly cooked centres, and an attractive appearance.
When to Chill the Scone Dough
If the kitchen is warm or the dough feels soft and greasy, place it in the refrigerator for approximately ten minutes before cutting. A short chill firms the butter and makes the dough easier to handle. This pause can also help the scones maintain their round shape as they begin baking.
Chilling is especially useful during warm weather or when the butter softened while being rubbed into the flour. However, there is no need for a long refrigeration period when the ingredients and dough remain cool. The recipe is designed to move quickly from mixing to baking, which is one reason it can be completed in under 30 minutes.
If chilling the shaped scones, keep the baking tray ready and ensure the oven has reached the correct temperature before removing them from the refrigerator. Moving the cold dough directly into a hot oven creates the strong temperature contrast that helps the butter produce steam and supports a lighter, flakier interior.
Brushing and Baking the Scones
Brush the tops lightly with milk before placing the baking sheet in the oven. Use a pastry brush and avoid soaking the surfaces. A thin coating is sufficient to encourage a warm golden color. Keep the milk mainly on top instead of letting it drip heavily down the sides, where it could affect the rise.
Bake the scones for 12 to 15 minutes. They are ready when they have puffed, the tops are lightly golden, and the bases look set. Baking time depends on the exact size and thickness of the rounds, so begin checking around 12 minutes while allowing larger scones enough time to cook in the centre.
Avoid overbaking. Gluten-free baked goods can lose moisture quickly, and a few unnecessary minutes may turn tender scones dry. Remove them when they are set and lightly colored rather than waiting for a deeply browned surface. Transfer them to a wire rack and allow them to cool briefly before serving.
How to Tell When the Scones Are Ready
Properly baked gluten-free fruit scones should feel light for their size and have dry, set surfaces. The tops should be gently golden rather than pale and doughy. If you lift one carefully, the bottom should also show light browning without appearing dark or burned around the edges.
You can gently press the top of a scone to check whether it feels set. It should offer slight resistance rather than remaining wet or collapsing. If the pieces are particularly large, open one from the middle of the tray after a brief cooling period to confirm that the centre is baked rather than sticky.
Remember that the scones continue setting for a few minutes after leaving the oven. Moving them immediately may cause the tender gluten-free structure to crack. Let them rest briefly on the tray, then use a flat spatula to place them on a wire rack where air can circulate around the bases.
Serving Gluten-Free Fruit Scones
These fruit scones are at their best when served slightly warm. Split them gently through the centre and enjoy them plain or with butter, clotted cream, or jam. Their mild sweetness works well with traditional teatime toppings, while the pieces of dried fruit make each bite flavorful even without an additional spread.
For a British-style afternoon tea, arrange the scones on a serving plate with individual dishes of jam and cream. Add tea, fresh fruit, and other gluten-free treats if desired. Check that every accompaniment is gluten-free when serving someone with celiac disease, especially if shared knives or serving spoons could introduce crumbs.
The scones also make a convenient breakfast or brunch addition. Serve them with hot tea or coffee, or include them in a larger spread. Because they bake quickly, they can be prepared shortly before guests arrive and brought to the table while still pleasantly warm and fragrant.
Notes for Light and Tender Scones
Keep the butter and dough cool throughout preparation. Cold butter supports a lighter interior, while melted or softened butter may produce greasy, dense scones. Work quickly, use your fingertips when rubbing in the butter, and chill the dough briefly if it becomes too warm or difficult to shape.
Handle the dough as little as possible once the liquid has been added. Gentle mixing and shaping preserve a tender texture. Press the cutter straight down without twisting, make the dough approximately one inch thick, and place the scones in a fully preheated oven to encourage a good rise.
Use the original ingredient quantities without adding extra liquid, sugar, fruit, or flour. Gluten-free flour blends behave differently from wheat flour, and unnecessary adjustments can change the texture significantly. The finished dough should be soft and cohesive, while the baked scones should be tender enough to split without immediately crumbling apart.
Common Problems and Simple Solutions
Flat scones are often caused by weak baking powder, dough that was shaped too thinly, a cool oven, or butter that became too soft. Check the baking powder’s freshness, preheat the oven completely, maintain the one-inch dough thickness, and keep the butter cold until the tray enters the oven.
Dry scones may result from too much flour, overbaking, or excessive handling. Measure the flour carefully, avoid packing it into the cups, and begin checking the scones after 12 minutes. Remove them once lightly golden and set instead of waiting until the entire surface becomes dark brown.
If the scones crumble excessively, make sure the flour blend contains xanthan gum and that the complete quantities of egg and milk were incorporated. Let them cool briefly before moving or splitting them. Gluten-free scones are more delicate while very hot and become more stable after a short resting period.
Storing Gluten-Free Fruit Scones
Allow leftover scones to cool completely before placing them in an airtight container. Store them at room temperature for up to two days. Sealing them while warm can trap steam and make the surfaces damp, while leaving them uncovered for too long may cause the tender centres to dry out.
Gluten-free scones are most enjoyable on the day they are baked, but gentle reheating can improve the texture of stored pieces. Warm them briefly in a moderate oven until heated through. Avoid prolonged reheating because it can remove moisture and make the crumb firmer or more fragile.
Keep the container in a cool, dry area away from direct sunlight and kitchen heat. If stacking the scones, place parchment paper between the layers to protect their surfaces. Store toppings such as butter, jam, and cream separately and add them only when the scones are ready to be served.
Freezing Unbaked Scones
For convenient future baking, arrange the cut, unbaked scones on a parchment-lined tray and freeze them until firm. Once solid, transfer them to a suitable freezer bag or airtight container. Separating them during the initial freezing stage prevents them from sticking together and allows individual portions to be removed when needed.
The unbaked scones can remain frozen for up to two months. Label the container with the date and baking temperature so the instructions remain easy to follow. Bake directly from frozen rather than thawing them, adding approximately two or three minutes to the original 12-to-15-minute baking time.
Check the frozen scones near the end because their exact baking time will depend on size and freezer temperature. They should be puffed, lightly golden, and set in the centre. Baking only the number required allows you to enjoy freshly cooked gluten-free fruit scones without preparing a new batch every time.
Important Notes
These Gluten-Free Fruit Scones bring a classic teatime favorite back to the table with a simple flour substitution and careful handling. The combination of cold butter, a xanthan-gum-containing flour blend, baking powder, egg, and milk creates a tender foundation, while dried fruit supplies color, sweetness, and a traditional finish.
From mixing to baking, the recipe takes approximately 25 minutes and requires no specialized machine. Keep the ingredients cool, avoid overworking the dough, cut the rounds cleanly, and bake them in a properly preheated oven. The result is a batch of warm, buttery, fruit-filled scones suitable for breakfast, brunch, or afternoon tea.
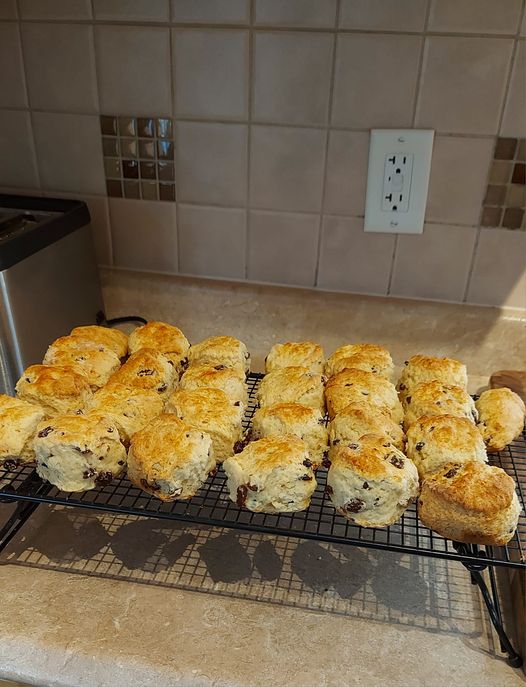
Gluten-Free Fruit Scones
Light, tender, and buttery gluten-free scones filled with dried fruit. These easy British-style fruit scones are ready in approximately 25 minutes and taste delicious served warm with butter, jam, or clotted cream.
8
servings10
minutes15
minutes260
kcal25
minutesIngredients
2 cups gluten-free all-purpose flour containing xanthan gum
1 tablespoon baking powder
¼ cup sugar
1 pinch salt
½ cup cold butter, cut into cubes
½ cup dried fruit, such as raisins, dried cranberries, or mixed fruit
1 large egg
½ cup milk, with a little reserved for brushing
Directions
- Preheat the oven to 200°C (400°F).
- Line a baking sheet with parchment paper.
- Combine the flour, baking powder, sugar, and salt.
- Add the cold cubed butter.
- Rub it into the flour until coarse crumbs form.
- Stir in the dried fruit.
- Whisk the egg and milk in a separate bowl.
- Add the wet mixture to the dry ingredients.
- Stir gently until a soft dough forms.
- Transfer the dough to a lightly floured surface.
- Pat it into a round approximately 1 inch thick.
- Cut out the scones with a round cutter.
- Arrange them on the prepared baking sheet.
- Brush the tops lightly with reserved milk.
- Bake for 12–15 minutes until risen and golden.
- Cool briefly on a wire rack.
- Serve the scones while pleasantly warm.
Nutrition Facts
8 servings per container
- Amount Per ServingCalories260
- % Daily Value *
- Total Fat
13g
17%
- Trans Fat g
- Total Carbohydrate
34g
13%
- Protein 4g 8%
* The % Daily Value tells you how much a nutrient in a serving of food contributes to a daily diet. 2,000 calories a day is used for general nutrition advice.