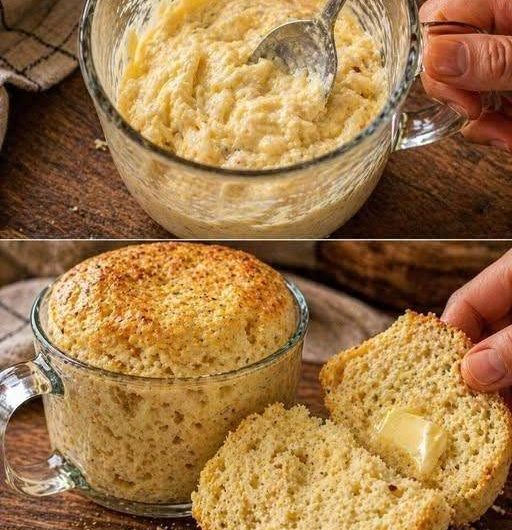
Finding a quick and satisfying bread alternative can be challenging when following a keto, low-carb, or carnivore lifestyle. Traditional bread is typically made with wheat flour, yeast, and sugar, making it unsuitable for people trying to reduce carbohydrates. This Zero Carb Bread in a Mug offers a simple solution by using only three basic ingredients to create a soft, fluffy bread in about 90 seconds. There is no kneading, no waiting for dough to rise, and no complicated baking process. Simply mix the ingredients in a microwave-safe mug, cook for a short time, and enjoy a warm bread substitute that works perfectly for breakfast, lunch, dinner, or snacks.
Why This Zero Carb Mug Bread Has Become So Popular
One of the biggest reasons this recipe has gained popularity among keto and low-carb enthusiasts is its convenience. Many bread recipes require several ingredients, special equipment, and a long preparation time. This microwave bread recipe removes all of those challenges while still producing a satisfying bread-like texture. It is an excellent option for busy mornings, quick lunches, or late-night cravings when you want something warm and filling without spending time in the kitchen. Because it cooks in less than two minutes, it has become a favorite recipe for anyone looking for a fast and reliable low-carb bread alternative.
Why You Love This Recipe
This Zero Carb Bread in a Mug combines simplicity, speed, and great texture in one recipe. Since it uses only three primary ingredients, preparation is easy even for beginners. There is no need to measure flour, activate yeast, or wait for dough to rise. The bread comes out soft enough for sandwiches while still being sturdy enough to toast. It can also be customized with herbs, cheese, or seasonings to suit different tastes. Whether you follow a ketogenic diet, a carnivore lifestyle, or simply want a healthier bread substitute, this recipe fits perfectly into your meal plan.
A Quick Bread Alternative Without Traditional Baking
One of the most appealing features of this recipe is that it completely eliminates the need for conventional baking. There is no oven to preheat, no loaf pan to prepare, and no lengthy baking time. Instead, everything is mixed directly in a mug or small ramekin before being cooked in the microwave. This makes it an excellent choice for students, office workers, travelers, or anyone with limited kitchen space. Even if you have never baked bread before, you can successfully prepare this recipe in just a few minutes.
Perfect for Keto, Low-Carb, and Carnivore Diets
People following specialized eating plans often struggle to find satisfying alternatives to bread. This mug bread helps solve that problem by providing a bread-like option that fits into ketogenic and low-carb lifestyles. The simple ingredient list contains no wheat flour and no added sugar, allowing you to enjoy sandwiches, toast, burgers, or breakfast without consuming traditional bread. Because the recipe is high in protein and healthy fats, it can also help you stay full for longer while supporting your daily nutritional goals.
Ingredients Overview
Only three basic ingredients are needed to prepare this quick microwave bread. Each ingredient serves an important purpose in creating the final texture, flavor, and structure. Although the ingredient list is short, choosing quality ingredients will produce better results and a more enjoyable eating experience.
Eggs
Eggs are the foundation of this recipe and provide the structure that replaces traditional flour. They create a soft yet stable texture while adding high-quality protein and essential nutrients. Beating the eggs thoroughly before cooking helps introduce air into the batter, producing a lighter and fluffier bread. Fresh eggs generally provide the best texture and flavor, making them the preferred choice for this recipe.
Butter
Butter adds moisture, richness, and flavor to the mug bread. Without butter, the finished bread can become dry or rubbery after microwaving. Melted butter blends smoothly with the eggs, creating a batter that cooks evenly and produces a softer texture. Using real butter also enhances the overall taste while contributing healthy fats that fit well within ketogenic eating plans.
Baking Powder
Although only a small amount is required, baking powder plays a very important role in creating the bread’s fluffy texture. During cooking, it releases tiny air bubbles that help the batter rise slightly, preventing the bread from becoming dense. Mixing the baking powder thoroughly throughout the batter ensures an even texture and consistent rise from top to bottom.
Optional Ingredients for Extra Flavor
While the basic recipe contains only three ingredients, adding optional seasonings allows you to customize the flavor without making the preparation more difficult. A pinch of salt enhances the overall taste, while garlic powder adds savory depth that pairs well with breakfast or sandwiches. Italian seasoning creates an herb-flavored bread that complements grilled meats, burgers, and soups. Everything bagel seasoning introduces additional texture and flavor, while shredded cheese melts into the bread for an even richer result. Fresh herbs such as parsley or chives can also be added to provide freshness and color.
Why Eggs Replace Flour So Successfully
Traditional bread relies on flour and gluten to create its structure, but this recipe uses eggs as the primary binding ingredient instead. As the eggs cook, their proteins firm up naturally, producing a stable texture that resembles bread. Although the flavor is slightly different from wheat bread, proper mixing and careful cooking create a surprisingly satisfying substitute. Combined with butter and baking powder, the eggs form a soft, airy bread that slices easily and can even be toasted for additional texture.
The Benefits of Microwave Cooking
Microwave cooking allows this recipe to be completed in a fraction of the time required for traditional bread baking. Instead of waiting an hour or more for dough to rise and bake, this bread is ready in approximately 90 seconds. The microwave cooks the batter quickly while helping retain moisture, resulting in a soft interior that remains enjoyable whether served immediately or lightly toasted afterward. This fast cooking method makes the recipe especially valuable for people with busy schedules who still want homemade food.
Choosing the Right Mug or Ramekin
The container you use can influence the final shape and texture of the bread. A microwave-safe mug with enough space allows the batter to rise comfortably without overflowing. Small ramekins also work well and often produce a flatter shape that is easier to slice into sandwich rounds. Regardless of the container you choose, lightly greasing it before adding the batter ensures the finished bread releases easily and maintains its shape after cooking.
Step-by-Step Preparation Guide
Preparing this Zero Carb Bread in a Mug is remarkably simple, making it one of the fastest homemade bread alternatives available for keto and low-carb lifestyles. Although the recipe requires only a few ingredients, following each step carefully helps produce a softer texture and better rise. Paying attention to mixing, cooking time, and cooling will ensure the bread is light, fluffy, and easy to slice. Even beginners with little cooking experience can successfully make this recipe in just a few minutes.
Step 1: Prepare the Mug
Start by selecting a microwave-safe mug or small ramekin that has enough room for the batter to expand during cooking. Lightly grease the inside with butter or cooking spray to prevent sticking. This simple step makes it much easier to remove the finished bread while keeping its shape intact. Proper greasing also reduces cleanup and helps create a smooth outer surface once the bread is turned out onto a plate.
Step 2: Melt the Butter
Place the butter into the prepared mug and microwave it for approximately 10 to 15 seconds until fully melted. Allow it to cool slightly before adding the eggs. Mixing eggs directly into extremely hot butter may begin cooking them prematurely, which can affect the final texture. Slightly cooled butter blends more evenly into the batter and helps create a smoother mixture.
Step 3: Add the Eggs
Crack the eggs into the mug and beat them thoroughly with a fork until the yolks and whites are completely combined. Proper mixing introduces small air bubbles into the batter, helping create a lighter texture after cooking. Taking an extra few seconds to whisk the eggs well can make a noticeable difference in the softness and overall appearance of the finished bread.
Step 4: Mix in the Baking Powder
Sprinkle the baking powder evenly over the egg mixture and stir thoroughly until the batter becomes completely smooth. There should be no visible lumps or dry pockets remaining. Even distribution of the baking powder ensures the bread rises evenly during microwaving, producing a fluffy texture throughout instead of dense sections.
Step 5: Microwave the Bread
Place the mug into the microwave and cook on high power for approximately 90 seconds. Microwave power varies between appliances, so cooking times may differ slightly. Avoid opening the microwave too early, as consistent cooking helps the bread rise properly. The batter will expand as it cooks before settling slightly once removed from the microwave.
Step 6: Check for Doneness
After cooking, examine the top of the bread. It should appear firm, fully set, and spring back gently when touched. If the center still appears wet, microwave the bread for an additional 10 to 15 seconds. Avoid excessive cooking because overcooking removes moisture and may produce a dry or rubbery texture.
Step 7: Cool Before Slicing
Carefully remove the mug from the microwave using a towel or oven mitt, as it may be very hot. Allow the bread to cool for one to two minutes before removing it from the mug. This short cooling period allows the structure to firm slightly, making slicing easier while preserving its soft texture.
Step 8: Slice and Serve
Turn the bread onto a cutting board or plate and slice it into halves or rounds, depending on how you plan to serve it. It can be enjoyed immediately while still warm or lightly toasted to create a firmer crust and more traditional bread texture. The finished bread pairs well with both sweet and savory toppings.
Understanding the Texture
Unlike traditional yeast bread, this microwave bread develops its structure from eggs rather than flour and gluten. The result is a soft, moist, and airy texture that resembles bread while remaining suitable for ketogenic and low-carb diets. Toasting the slices adds a lightly crisp exterior that many people find even closer to conventional bread. Although the flavor is mildly egg-based, optional seasonings and toppings can easily customize it to suit different meals.
Common Mistakes to Avoid
Even a simple three-ingredient recipe can produce different results depending on preparation. Avoiding a few common mistakes helps ensure the bread remains soft, fluffy, and enjoyable every time.
Overcooking the Bread
The most common mistake is leaving the bread in the microwave for too long. Because microwave ovens vary in power, cooking beyond the required time can quickly dry out the bread. Start with the recommended cooking time and add only a few extra seconds if necessary.
Not Mixing the Batter Thoroughly
Poorly mixed batter can leave pockets of baking powder or unevenly blended eggs, resulting in inconsistent texture. Stir until the mixture becomes completely smooth before microwaving.
Using a Mug That Is Too Small
The batter rises during cooking, so choosing a very small mug may cause it to overflow. Selecting a larger microwave-safe mug or ramekin gives the bread enough room to expand while maintaining a neat appearance.
Forgetting to Grease the Mug
Skipping the greasing step can make removing the finished bread difficult. A light coating of butter or cooking spray allows the bread to release easily without breaking apart.
Serving Suggestions
This versatile mug bread works well with a wide variety of meals throughout the day. Spread warm butter over freshly sliced bread for a quick breakfast or enjoy it with cream cheese for a creamy snack. It can also be used to prepare breakfast sandwiches filled with eggs and bacon or transformed into hamburger buns for a satisfying low-carb meal. Toasted slices pair beautifully with avocado, grilled chicken, deli meats, or your favorite keto-friendly spreads. Because of its neutral flavor, the bread complements both savory and lightly seasoned toppings.
Flavor Variations
The basic recipe serves as an excellent foundation for many delicious variations. Small additions can completely change the flavor while maintaining the same simple preparation method.
Cheesy Mug Bread
Mix 2 tablespoons shredded cheddar cheese into the batter before microwaving. The cheese melts during cooking, creating a richer flavor and softer interior that works especially well with burgers and breakfast sandwiches.
Garlic Bread Version
Add 1/4 teaspoon garlic powder to the batter before cooking. This simple variation produces a savory bread that pairs perfectly with soups, salads, grilled meats, or roasted vegetables.
Herb Bread
Stir in Italian seasoning and dried parsley to create an aromatic herb bread with fresh flavor. This version complements sandwiches, chicken dishes, and Mediterranean-inspired meals.
Carnivore Version
For those following a carnivore diet, mix in grated Parmesan cheese and extra butter. These additions provide additional richness while maintaining a low-carbohydrate profile.
Storage Instructions
Although this mug bread is best enjoyed fresh, leftovers can be stored successfully for later use. Place cooled bread in an airtight container and refrigerate for up to three days. For longer storage, wrap the bread well and freeze it for up to one month. Allow frozen bread to thaw before lightly toasting it, which helps restore its texture and flavor.
Nutrition Benefits
This Zero Carb Bread in a Mug provides several nutritional advantages for people following ketogenic, low-carb, or carnivore eating plans. Eggs contribute high-quality protein that supports muscle maintenance and helps increase fullness. Butter supplies healthy fats that provide lasting energy while adding rich flavor and moisture. Because the recipe contains no added sugar and very few carbohydrates, it can be enjoyed as part of a carbohydrate-conscious lifestyle without sacrificing convenience or satisfaction.
Notes
For the fluffiest texture, beat the eggs thoroughly before adding the baking powder. Using room-temperature eggs can help create a smoother batter, although chilled eggs also work well. Toasting the finished bread enhances its texture and creates a more traditional bread-like bite. Different microwave ovens cook at different speeds, so small adjustments to cooking time may be necessary. This bread is best served warm and fresh, making it an excellent option for quick breakfasts, easy lunches, or satisfying low-carb snacks whenever you need them.
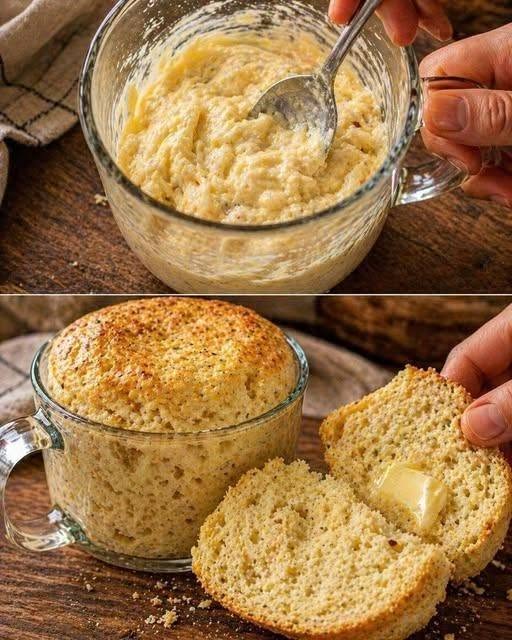
Zero Carb Bread in a Mug
This Zero Carb Bread in a Mug is a soft, fluffy, and incredibly quick microwave bread made with only three simple ingredients. Ready in about 90 seconds,
1
servings2
minutes2
minutes220
kcalIngredients
- Main Ingredients
2 large eggs
1 tablespoon butter, melted
1/4 teaspoon baking powder
- Optional Add-Ins
Pinch of salt
Garlic powder
Italian seasoning
Everything bagel seasoning
Shredded cheese
Fresh herbs
Directions
- Step 1: Prepare the Mug
Choose a microwave-safe mug or small ramekin.
Lightly grease the inside with butter or cooking spray to prevent sticking and make removing the bread easier after cooking. - Step 2: Melt the Butter
Place the butter in the mug.
Microwave for 10–15 seconds until completely melted.
Allow it to cool slightly before adding the eggs. - Step 3: Add the Eggs
Crack the eggs into the mug.
Using a fork, whisk thoroughly until the yolks and whites are completely combined. - Step 4: Add the Baking Powder
Sprinkle the baking powder over the egg mixture.
Mix thoroughly until the batter is smooth and free of lumps.
If using any optional seasonings or shredded cheese, stir them in at this stage. - Step 5: Microwave
Place the mug in the microwave.
Cook on high power for approximately 90 seconds.
Microwave cooking times may vary slightly depending on the wattage of your appliance. - Step 6: Check for Doneness
The bread should be fully cooked, lightly risen, and firm on top.
If necessary, microwave for an additional 10–15 seconds until completely cooked. - Step 7: Cool
Carefully remove the mug from the microwave.
Allow the bread to cool for 1–2 minutes before removing it from the mug. - Step 8: Slice and Serve
Turn the bread onto a plate.
Slice it in half or cut it into rounds.
Serve immediately while warm or lightly toast the slices for an even more bread-like texture.
Nutrition Facts
1 servings per container
- Amount Per ServingCalories220
- % Daily Value *
- Total Fat
18g
24%
- Total Carbohydrate
1g
1%
- Protein 14g 29%
* The % Daily Value tells you how much a nutrient in a serving of food contributes to a daily diet. 2,000 calories a day is used for general nutrition advice.