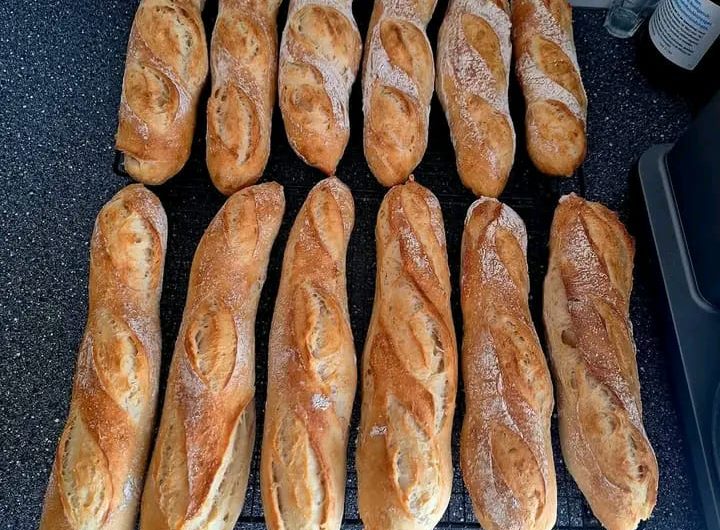
Nothing compares to the aroma of freshly baked bread filling your kitchen, especially when it’s a warm, golden baguette with a crisp crust and a soft, airy center. This Gluten-Free Baguette Bread recipe lets you enjoy the classic texture and flavor of traditional French bread without using wheat flour. Whether you’re following a gluten-free lifestyle because of celiac disease, gluten sensitivity, or personal preference, this homemade baguette delivers bakery-quality results with simple ingredients.
Unlike many gluten-free bread recipes that can turn out dense or crumbly, this loaf has a pleasantly chewy crumb and a beautifully crisp exterior. The carefully balanced ingredients create a dough that rises well and bakes into light, flavorful bread that’s perfect for sandwiches, garlic bread, bruschetta, or simply enjoying with butter and olive oil.
One of the greatest advantages of making your own gluten-free baguette is knowing exactly what goes into it. You can avoid unnecessary preservatives and enjoy fresh bread whenever you like. With a little patience during the rising stage, you’ll be rewarded with homemade bread that rivals what you’d find in an artisan bakery.
Why You Love This Recipe
This Easy Gluten-Free Baguette Bread combines everything people love about fresh French bread while remaining completely gluten-free. The crust bakes to a beautiful golden color with a satisfying crunch, while the inside stays tender, fluffy, and easy to slice.
Unlike store-bought gluten-free bread, which often contains preservatives and can become dry quickly, this homemade version has a fresh flavor and soft texture that make every slice enjoyable. It also freezes well, making it ideal for meal preparation and busy households.
Another reason this recipe stands out is its versatility. You can enjoy it for breakfast, lunch, dinner, or as an appetizer. It works equally well for sandwiches, toast, crostini, garlic bread, or alongside soups and salads.
What Makes Gluten-Free Bread Different?
Traditional baguettes rely on gluten to create elasticity and structure. Gluten traps air produced by the yeast, allowing bread to rise while creating its signature chewy texture.
In gluten-free baking, the flour blend and xanthan gum work together to replace many of gluten’s functions. Although the dough behaves differently from wheat dough, proper hydration and mixing help produce bread that is surprisingly light and satisfying.
Understanding this difference helps explain why gluten-free dough is naturally softer and stickier than traditional bread dough. This texture is completely normal and actually contributes to a better finished loaf.
Why This Homemade Gluten-Free Bread Works So Well
This recipe uses a combination of simple ingredients that each play an important role. Instant yeast provides lift and creates the airy crumb, while olive oil keeps the bread moist and tender.
Apple cider vinegar improves both flavor and texture while supporting yeast activity. Warm water activates the yeast and provides the moisture needed for proper dough consistency. Together, these ingredients create a loaf with a crisp crust and soft interior that’s ideal for everyday baking.
Understanding the Ingredients
Every ingredient contributes to the success of this recipe. Gluten-free all-purpose flour forms the foundation of the bread, while xanthan gum helps provide elasticity and structure. Salt strengthens the dough and enhances flavor without making the bread overly salty.
Sugar feeds the yeast during the initial activation stage, encouraging a strong rise. Warm water activates the yeast, olive oil enriches the dough, and apple cider vinegar improves texture while creating a balanced flavor.
An optional egg white brushed over the surface before baking creates a glossy finish and encourages beautiful browning.
Activating the Yeast
Proper yeast activation is essential for producing light, fluffy bread. Combine the warm water, sugar, and instant yeast in a small bowl and allow the mixture to rest until it becomes foamy.
The water should feel comfortably warm rather than hot. Excessive heat can damage the yeast, while cool water slows activation and may reduce the rise.
Once bubbles appear across the surface, the yeast is fully activated and ready to be incorporated into the dough.
Mixing the Dough
While the yeast activates, whisk together the gluten-free flour and salt in a large mixing bowl. Mixing the dry ingredients first helps distribute the salt evenly throughout the flour.
Pour the activated yeast mixture into the bowl along with the olive oil and apple cider vinegar. Mix using a stand mixer fitted with a dough hook or a hand mixer until the dough becomes smooth and fully combined.
Unlike traditional bread dough, gluten-free dough remains soft and slightly sticky. Resist the temptation to add too much extra flour, as additional flour may produce a dry, dense loaf.
Shaping the Baguettes
Line a baking tray with parchment paper before dividing the dough into two equal portions. With lightly damp hands or a silicone spatula, gently shape each portion into a long baguette.
Smooth the tops carefully to reduce cracking during baking. Since gluten-free dough doesn’t hold tension like wheat dough, shaping gently helps preserve the air created during mixing.
The loaves don’t need to be perfectly shaped. As they rise and bake, they’ll naturally develop the classic appearance associated with homemade French bread.
Allowing the Dough to Rise
Cover the shaped baguettes loosely with a clean kitchen towel and place them in a warm, draft-free location. Allow them to rise for approximately 45 to 60 minutes.
Unlike traditional wheat bread, gluten-free dough usually doesn’t double in size. Instead, look for a noticeable increase in volume and a lighter appearance. This gentle rise helps create the soft interior while preventing the loaf from collapsing during baking.
Baking the Perfect Gluten-Free Baguette
Once the dough has completed its rise, it’s time to bake your homemade baguettes. Preheat the oven to 425°F (220°C) so it reaches the proper temperature before the bread goes in. High heat is one of the secrets to creating a crisp, bakery-style crust while keeping the inside soft and tender. Preparing the oven properly before baking ensures even cooking and helps the bread rise beautifully during the first few minutes.
For the best results, place an oven-safe pan filled with hot water on the lower rack before baking. As the water heats, it creates steam inside the oven, which delays crust formation and allows the bread to expand fully. This simple technique is commonly used by artisan bakers because it produces a thinner, crispier crust and improves the overall appearance of the loaf.
Creating a Beautiful Golden Crust
Before placing the baguettes into the oven, brush the tops lightly with egg white if you choose to use it. This optional step gives the finished bread a beautiful golden color and an attractive glossy finish. While the bread will still taste excellent without it, the egg wash provides a more traditional bakery-style appearance.
Bake the loaves until they develop a rich golden-brown color and the crust feels firm when gently touched. When tapped on the bottom, the finished baguette should produce a hollow sound, indicating that the interior has baked completely.
Why Cooling Is Just as Important as Baking
Although it can be tempting to slice into warm bread immediately, allowing the baguettes to cool is an important final step. Place them on a wire cooling rack for at least 20 minutes after removing them from the oven.
During this resting period, the remaining steam escapes from the loaf while the crumb finishes setting. Cutting the bread too early can compress the interior and create a gummy texture. A little patience rewards you with clean slices and a light, airy crumb.
Serving Ideas
Fresh Gluten-Free French Bread is incredibly versatile and complements countless meals. Serve thick slices with butter while still slightly warm for a simple breakfast or afternoon snack. Dip pieces into high-quality olive oil with herbs, or spread with roasted garlic for a flavorful appetizer.
This bread also makes outstanding sandwiches. Fill it with sliced turkey, grilled chicken, cheese, roasted vegetables, or fresh salad ingredients for a satisfying lunch. Because of its sturdy crust and soft interior, it holds fillings well without becoming soggy.
For entertaining, slice the baguette into rounds and toast them lightly to make crostini or bruschetta. Top with tomatoes, herbs, cheese, smoked salmon, or your favorite spreads for elegant appetizers.
Delicious Ways to Enjoy Homemade Baguette
Beyond sandwiches, this bread pairs wonderfully with soups, stews, pasta dishes, and casseroles. It also makes excellent garlic bread when brushed with butter, garlic, and herbs before toasting.
Leftover baguette can be transformed into homemade croutons, breadcrumbs, bread pudding, or stuffing, reducing waste while creating delicious new dishes.
Easy Recipe Variations
This recipe serves as an excellent base for many creative variations. Mix dried herbs such as rosemary, thyme, oregano, or Italian seasoning into the dough for an aromatic herb baguette.
You can also sprinkle sesame seeds, poppy seeds, sunflower seeds, or everything bagel seasoning over the egg wash before baking to create additional texture and flavor.
For a richer loaf, substitute the olive oil with melted butter while keeping the remaining ingredients exactly the same. Each variation offers a slightly different flavor while maintaining the same crisp crust and soft interior.
Storage and Freezing
Homemade gluten-free bread is best enjoyed fresh, but it stores well when handled properly. After the baguettes have cooled completely, place them in an airtight container or bread bag and store them at room temperature for up to 2 days.
For longer storage, wrap each loaf tightly and freeze for up to 3 months. When ready to serve, thaw at room temperature and warm in the oven for several minutes to restore the crisp crust.
Individual slices can also be frozen, making it easy to enjoy fresh bread whenever needed without thawing the entire loaf.
Health Benefits
Preparing your own Homemade Gluten-Free Bread allows you to control the quality of every ingredient. Many commercial gluten-free breads contain preservatives and unnecessary additives, while homemade bread focuses on simple pantry staples.
Olive oil contributes heart-healthy fats, while gluten-free flour blends often contain a variety of naturally gluten-free grains that provide different nutrients and textures. Making bread from scratch also allows you to adjust ingredients to suit your dietary preferences.
Common Mistakes to Avoid
One of the most common mistakes is adding extra flour because the dough feels sticky. Gluten-free dough should remain softer than traditional bread dough, and adding too much flour can produce a dry, heavy loaf.
Another mistake is skipping the steam during baking. Steam plays a major role in creating the crisp crust associated with artisan baguettes.
Avoid slicing the bread immediately after baking. Cooling allows the crumb to finish setting, resulting in better texture and cleaner slices.
Notes
Use a Quality Gluten-Free Flour Blend
Choose an all-purpose gluten-free flour blend that already contains xanthan gum. If your blend doesn’t include it, add 1 teaspoon to improve the dough’s structure.
Keep the Dough Moist
Gluten-free dough naturally contains more moisture than wheat dough. Resist the urge to add unnecessary flour.
Create Steam During Baking
A small pan of hot water inside the oven produces steam that helps develop a crisp, bakery-style crust.
Cool Before Slicing
Allow the bread to rest for at least 20 minutes so the interior can fully set before cutting.
Freeze for Later
Freeze whole loaves or individual slices for quick homemade bread whenever you need it.
Gluten-Free Baguette Bread
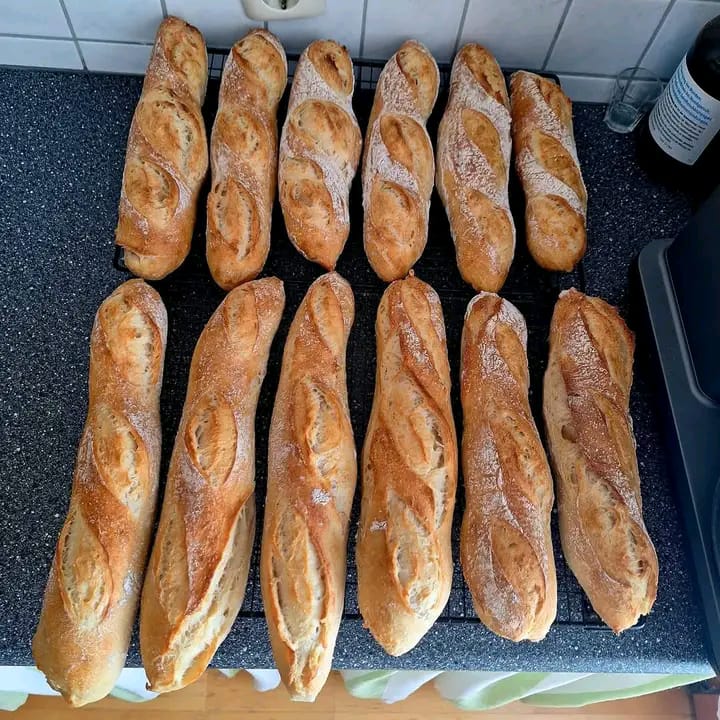
This Gluten-Free Baguette Bread features a crispy, golden crust with a soft, fluffy interior that closely resembles traditional French bread.
8
servings15
minutes20
minutes170
kcal30
minutes45
minutes1
hour50
minutesIngredients
2 cups gluten-free all-purpose flour (with xanthan gum)
1½ tsp salt
1 tbsp sugar
1 packet (7 g) instant yeast
1 cup warm water (100°F / 38°C)
2 tbsp olive oil
1 tsp apple cider vinegar
1 egg white (for brushing)
Directions
- Activate the Yeast
Mix the warm water, sugar, and yeast.
Let stand for 10 minutes until foamy. - Mix the Dough
Combine the gluten-free flour and salt.
Add the yeast mixture, olive oil, and apple cider vinegar.
Mix until a soft, slightly sticky dough forms. - Shape the Baguettes
Divide the dough into 2 equal portions.
Shape into long baguettes on a parchment-lined baking tray.
Smooth the tops with damp hands. - Let Rise
Cover lightly with a towel.
Allow to rise for 45–60 minutes in a warm place. - Cool
Transfer to a wire rack.
Cool for 20 minutes before slicing.
Nutrition Facts
8 servings per container
- Amount Per ServingCalories170
- % Daily Value *
- Total Fat
5g
7%
- Total Carbohydrate
30g
11%
- Protein 3g 6%
* The % Daily Value tells you how much a nutrient in a serving of food contributes to a daily diet. 2,000 calories a day is used for general nutrition advice.